Create encrypted data backups to Backblaze B2
Creating & keeping backups of your data is essential and often not done because of the hassle associated with it. Using the powerful & easy command line tool HashBackup you can create encrypted local and remote backups in different storage destinations like WebDAV, Amazon S3, Backblaze B2.
Remote storage backups protect you against the loss of the local backup data due to hardware failure or an on-site disaster. HashBackup can write to different remote storage destinations. In this article we will use Backblaze B2 as the remote storage destination
Prerequisite
- a running Unix system (Linux, BSD, MacOS) with a connection to the internet.
- a Backblaze B2 account and the possibility to create a B2 Bucket
1. Installing HashBackup
- Download HashBackup application using the correct URL for your system architecture:
wget --content-disposition -q http://www.hashbackup.com/download/hb-linux-64bit.tar.gz?attredirects=0&d=1Unpack the HashBackup executable…:
tar xfz hb-linux-64bit.tar.gz…and copy it into /usr/bin/ and make it accessible in the regular PATH:
cp -v hb /usr/bin/2. Create a B2 Bucket & create Your Application Keys
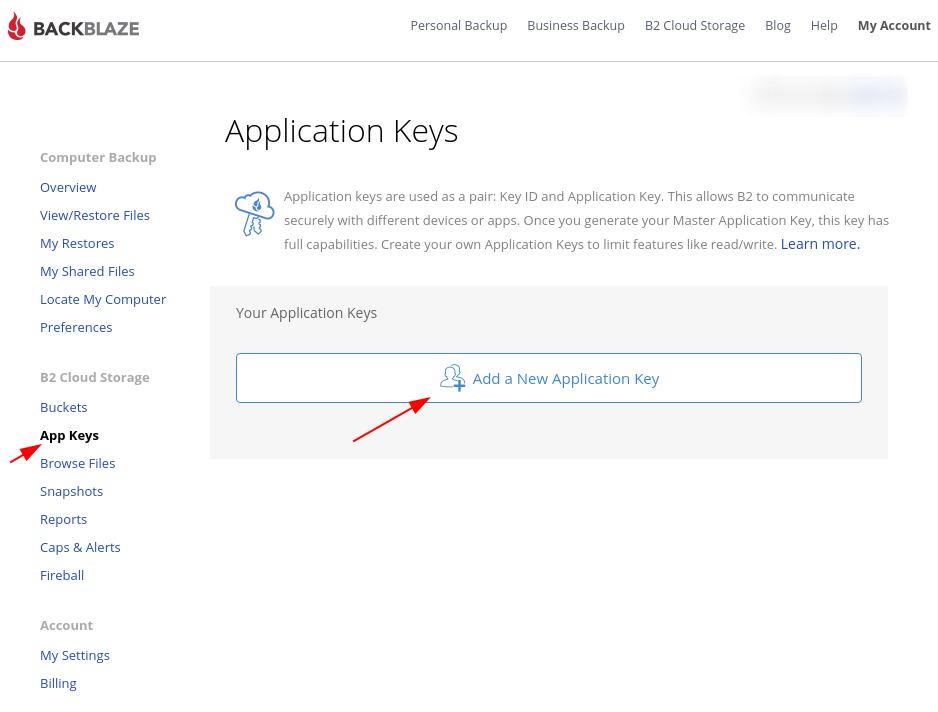
- Login into your Backblaze B2 account and create a new B2 bucket which you’ll use for the remote backup:


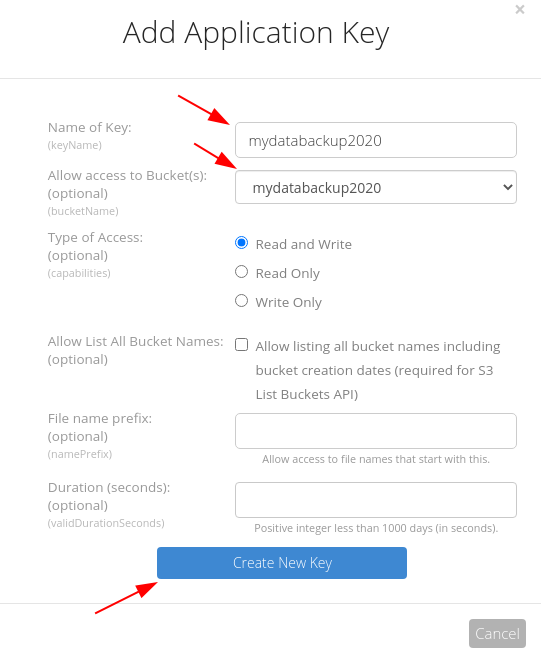
- Next a new pair of application keys will be created which will be used for the authentication during the remote backup:
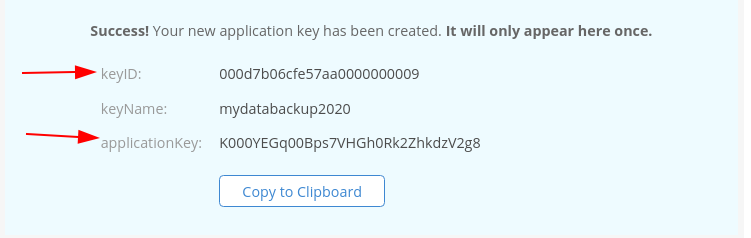
After the application keys are created you’ll get the keyID and applicationKey values, which you’ll need in the next step:
3. Initialise the local HashBackup directory
After the installation of the HashBackup command line tool hb you’ll create the directory in which the local backup of your data will be stored and from where the remote backups will be configured.
- Initialize the local Hashbackup directory:
user@local:~# hb init -c /bak/mydatabackup2020

HashBackup installer #6 Copyright 2009-2020 HashBackup, LLC
Downloading http://upgrade.hashbackup.com/2525/hb.r2525.Linux.x86_64.bz2
Verified file signature
Installed #2525 as /usr/bin/hb

HashBackup #2525 Copyright 2009-2020 HashBackup, LLC
Backup directory: /bak/mydatabackup2020
Permissions set for owner access only
Created key file /bak/mydatabackup2020/key.conf
Key file set to read-only
Setting include/exclude defaults: /bak/mydatabackup2020/inex.conf

VERY IMPORTANT: your backup is encrypted and can only be accessed with
the encryption key, stored in the file:

    /bak/mydatabackup2020/key.conf

You MUST make copies of this file and store them in secure locations,
separate from your computer and backup data.  If your hard drive fails,
you will need this key to restore your files.  If you have setup remote
destinations in dest.conf, that file should be copied too.

Backup directory initialized
As mentioned by the hb command you should keep the file key.conf in a secure location to be able to restore your encrypted backup.
4. Setup B2 Backblaze login credentials
- for this you’ll need to create the file dest.conf in your local Hashbackup directory with the keyID and applicationKey from the previous step:
nano /bak/mydatabackup2020/dest.conf The file dest.conf:
 destname b2
 type b2
 accountid 000d7b06cfe57aa0000000009
 appkey K000YEGq00Bps7VHGh0Rk2ZhkdzV2g8
 bucket mydatabackup2020
dir mydata2020- accountid: your B2 keyID
- appkey: your B2 applicationKey
- bucket: your B2 bucket name
- dir: a name you can define. Ideally the same as your source directory you are backing up.
5. Create your backup
- let the hb command backup your source directory /user/mydata2020/ to the defined backup directory /bak/mydatabackup2020/ and use the there defined remote storage destination:
user@local:~# hb backup -c /bak/mydatabackup2020/ /user/mydata2020/
$HashBackup #2525 Copyright 2009-2020 HashBackup, LLC
Backup directory: /bak/mydatabackup2020
Backup start: 2020-07-22 19:34:50
Using destinations in dest.conf
Copied HB program to /bak/mydatabackup2020/hb#2525
This is backup version: 0
Dedup not enabled; use -Dmemsize to enable
/
/bak
/bak/mydatabackup2020
/bak/mydatabackup2020/inex.conf
/user
/user/mydata2020
/user/mydata2020/test.txt
Copied arc.0.0 to b2 (144 bytes 1s 79 bytes/s)
Writing hb.db.0
Copied hb.db.0 to b2 (4.7 KB 1s 3.4 KB/s)
Copied dest.db to b2 (36 KB 1s 24 KB/s)

Time: 4.0s
CPU:  0.1s, 3%
Mem:  72 MB
Checked: 7 paths, 110 bytes, 110 bytes
Saved: 7 paths, 110 bytes, 110 bytes
Excluded: 0
Dupbytes: 0
Compression: 12%, 1.1:1
Efficiency: 0.00 MB reduced/cpusec
Space: +96 bytes, 36 KB total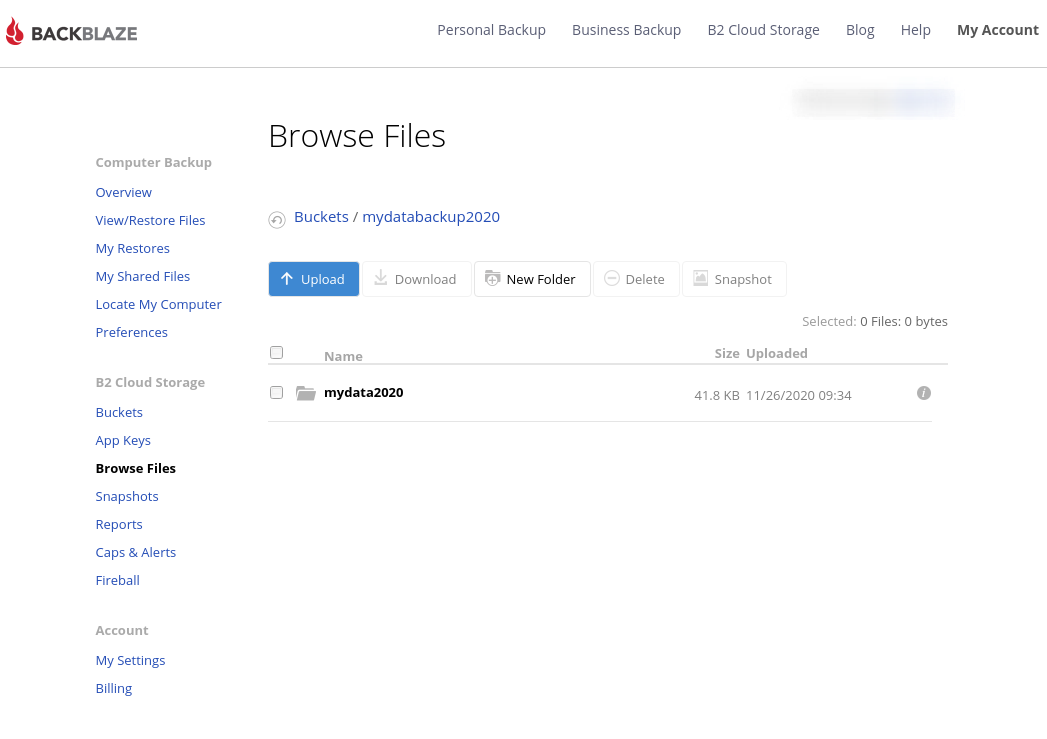
No errors- check that the data is created in Backblaze B2 data bucket:
6. Restore your backup
- The backup can be easily restored from the backup directory
user@local:~# hb get -c /bak/mydatabackup2020/ /user/mydata2020

HashBackup #2525 Copyright 2009-2020 HashBackup, LLC
Backup directory: /bak/mydatabackup2020
Most recent backup version: 0
Restoring most recent version
Using destinations in dest.conf

Restoring mydata2020 to /user
/user/mydata2020
/user/mydata2020/test.txt
Restored /user/mydata2020 to /user/mydata2020
No errors- to be able to recover the backup files stored on a remote destination you’ll need to always keep the key.conf and dest.conf files. You can copy these into a newly created empty backup directory and recovery all the data from the remote destination by calling the hb command with the recover parameter:
user@local:~# ls /bak/mydatabackup2020_NEW_DIR

dest.conf  key.conf

user@local:~# hb recover -c /bak/mydatabackup2020_NEW_DIR/

HashBackup #2525 Copyright 2009-2020 HashBackup, LLC
Backup directory: /bak/mydatabackup2020_NEW_DIR
Using destinations in dest.conf

Recovering backup files from destination: b2
Files will be copied to: /bak/mydatabackup2020_NEW_DIR

Proceed with recovery? yes

Removed /bak/mydatabackup2020_NEW_DIR/dest.db
Getting dest.db from b2
Getting hb.db from b2
Queueing hb.db files

Waiting for /bak/mydatabackup2020_NEW_DIR/hb.db.0
Loading hb.db.0
Verified hb.db.0 signature

Verified hb.db signature
Checking db integrity
Removing hb.db.N files
Queueing arc files from b2
Waiting for 1 arc files...

Backup files recovered to: /bak/mydatabackup2020_NEW_DIR
Verify the backup with the selftest command:
  $ hb selftest -c /bak/mydatabackup2020_NEW_DIR/
If inex.conf was customized, restore it with the hb get command.- After the local backup directory has been repopulated from the remote destination you can use the get command to restore the respective backup data:
user@local:~# hb get -c /bak/mydatabackup2020_NEW_DIR/ /user/mydata2020

HashBackup #2525 Copyright 2009-2020 HashBackup, LLC
Backup directory: /bak/mydatabackup2020_NEW_DIR
Most recent backup version: 0
Restoring most recent version
Using destinations in dest.conf

Restoring mydata2020 to /user
/user/mydata2020
/user/mydata2020/test.txt
Restored /user/mydata2020 to /user/mydata2020
No errors
user@local:~# ls mydata2020/
test.txt
Conclusion
In this article we have used HashBackup to create and restore a backup of our data to a local and a remote backup destination.
↑ back to top ↑